Notable Features
HydeBar is a fully responsive HTML5 sidebar template for the static site generator Jekyll:
- Quickstart: Online in 5 minutes
- No dependencies - runs on GitHub Pages
- Responsive, CSS driven sidebar
- Reveal.js slideshow integration
- Posts archive page by year
- Category and tag index pages
- Atom feed
- robots.txt, sitemap.xml
- Custom 404 error page which shows the post archive
- Support for multiple authors
- Support for subtitles
- UI localization - help needed for more languages
- Easy ToC creation
- Figure captions with a CSS helper class
- More CSS helper classes
- Disqus comments
- Google Analytics
- W3C valid output - fast and secure
Miss something? Create it, share it…
Quickstart: Online in 5 minutes
Everything in your browser:
- Login to GitHub
- Fork repository HydeBar
- Edit
_config.yml(url, baseurl) - Change repository settings
- Rename to yourUserName.github.io
- Activate GitHub Pages
- Done!
On the very first time when GitHub is generating your site this could take some minutes.
After this quick start it is time to look in detail to some more settings:
_data/authors_config.yml- Permalink Jekyll Docs
- Your brand color
- Sidebar settings
- …
/about.md/imprint.md/privacy-statement.md- …
And of course you should delete or overwrite the default content with your own ;-)
No dependencies - runs on GitHub Pages
The template has no dependencies on external plugins - therefore it can run on GitHub Pages. Except for the Jekyll blackbox itself (which renders your site) everything is implemented with Liquid templates located in the directories _layouts and _includes. No hidden secrets and highly customizable to your needs :-)
Responsive, CSS driven sidebar
HydeBar is a fully responsive HTML5 template. Except for the integration of the Reveal.js slideshow, Disqus comments and Google analytics it needs no activated JavaScript on the client side. The sidebar is complete CSS driven.
Per default there are some sections on the sidebar: Under the Header you will find a list of all pages which have the Front Matter variable sidebar set to a value higher then 0. The value is used to order the pages.
Then we have a list of all Categories used in the posts. After that a list of all tags. Then a list of all contact details from the site author - see also _config.yml and _data/authors.
The last section is a list of all pages with the Front Matter variable sidebar-legal set to a value higher then 0.
All section headers are automatically hidden, when no data is found for the section. You can configure the visibility of each section in the file _config.yml - per default are categories and tags hidden (see also the archive page - they are shown there):
sidebar:
  pages: true
  categories: false
  tags: false
  contact: true
  legal: true
Reveal.js slideshow integration
Reveal.js (demo) supports directly Markdown - this is pretty cool, because we can write now also presentations in Markdown.
Clear - there are some special things when writing content for a presentation. The obvious question is how we mark the begin end the end of a slide. The answer: It depends on you - you can configure the slide separator as a regular expression. Per default we reuse the horizontal row - this seems to be very natural:
## Example Presentation

-----

## Introduction

---

### A vertical slide

It is indicated by three dashes

-----

## The next horizontal slide

It is indicated by five dashes

---

### Again a vertical slide

- A reference-style link to a [Markdown cheatsheet][1]
- Another link to [GitHub-flavored Markdown][2]

[1]: https://github.com/adam-p/markdown-here/wiki/Markdown-Cheatsheet#links
[2]: https://help.github.com/categories/writing-on-github/

-----

## The End
### Questions?
Some things to explain
Reveal.js supports horizontal and vertical slides and by pressing the Esc key you get a nice overview of all slides. If you organize your slides in horizontal main points and vertical details you are able to navigate fast in your whole presentation when using the overview. For a list of all shortcuts press the ? in a presentation
The default regular expression forces you to have a blank line before and after the horizontal row to be recognized as a slide separator.
Markdown allows you to provide so called reference-style links - you put the URL outside of the current text to improve the readability. Reveal seems to slice the presentation into single slides first and then rendering each slide. Because of this you need to have all URLs of reference-style links on the same slide - otherwise your links would not work. No big deal but good to know.
The Reveal.js integration assumes, that you put each slideshow in an own directory. The reason for this is that you normally have many resources like images or other stuff, which should be saved together with your slides. Another reason is that we need for the start of the slideshow a reveal layout and for the slides itself an extra markdown file without Front Matter. Jekyll will then convert the slides to HTML with the default layout and also copy the file itself to the _site folder for the webserver. An example directory:
.
├── ...
├── slides
|   └── 2017-11-22-example-presentation
|       ├── assets
|       |   ├── image_1.png
|       |   ├── image_2.png
|       |   └── ...
|       ├── index.md   # with Front Matter
|       └── slides.md  # without Front Matter
├── ...
To start the example presentation in a post or page you call a helper include:
{% include slides.html path="/slides/2017-11-22-example-presentation" %}
You don’t need to care about {{ site.baseurl }} - this is handled by the include. We call it now here - as a result you get a whole block of informations to run your presentation:
Open HTML presentation in a new window/tab
Do you want to have a PDF version of your slides? No problem, Reveal.js supports this with the help of Google Chrome or Chromium. You need to load a special CSS by passing in an URL parameter .../slides/2017-11-22-example-presentation?print-pdf and then print with the browsers built in “Save as PDF” function. All the details can be found here.
Reveal supports nine different themes out of the box. You can configure the default theme and other things in the _config.yml:
slides:
  theme: solarized
  data-separator: "^\\r?\\n-----\\r?\\n$"
  data-separator-vertical: "^\\r?\\n---\\r?\\n$"
  data-separator-notes: "^Notes:"
You can overwrite these settings in your presentations index.md
---
title: Example Presentation
lang: en
layout: slides
slides:
  theme: black
  data-separator-notes: "^My personal notes:"
---
Posts archive page by year
The template delivers an archive page. This page uses the following include to render a list of all posts by year:
{% include post-list-by-year.html %}
This include is also used on the custom 404 error page.
Category and tag index pages
Because we can not use external plugins for GitHub Pages we have to workaround this for category and tag pages.
The solution is to create for each category or tag an empty file with empty frontmatter in the directory /categories respective /tags. The default layout for these files is configured in _config.yml. The layouts are taking the category/tag value from the file name and rendering then the list of all posts for this category/tag.
You should use only lowercase slugified keywords for your category and tag pages and also in your posts Front Matter. The labels for your categories are maintained in this file: _data/labels.yml - if you forgot to configure a label here then the category or tag name is used as the default in the Navigation and also on each post in the meta section - you will see it…
To check, if you have forgotten to create a category or tag page you can use HTMLProofer. It is always a good idea to check all you links…
Atom feed
Because of the fact we support multiple authors and subtitles the default feed from Jekyll was not enough. We wanted also to customize the number of posts included in the feed. You can configure this limit in the _config.yml.
If you want to customize the feed feel free to edit the file _layouts/feed.xml. If you want to have a different name for your feed, then rename the file /feed.md and change in the _layouts/default.html the reference to your new feed name.
robots.txt, sitemap.xml
The robots.txt file is pointing all robots to the sitemap.xml file, which includes per default all posts and the pages, which are shown on the sidebar.
Custom 404 error page which shows the post archive
With Github Pages you have the possibility to deliver a custom 404 error page. We use it to show the user a nice error message and all available posts.
Support for multiple authors
Per default the site owner is the author of all posts. In the _config.yml you have only the name of the site author - all the details are defined in _data/authors.yml. Here you can configure multiple authors.
If one of your posts has a different or multiple authors simply define a author variable in the Front Matter with one or more authors like so:
---
title: My fancy blog post
author: [ogobrecht, madtsch] # you can omit the array brackets for a single author
---
Support for subtitles
Short and creative post titles are nice. Unfortunately you need sometimes a small description to clarify what the post is about. Therefore we have the subtitles:
---
title: HydeBar
subtitle: A Jekyll Sidebar Template
---
The subtitle is shown in all post listings like on the home and archive page. It is also prepended to the post text in the feed.xml.
UI localization - help needed for more languages
The main reason to have a localization is for displaying dates in the right language format. You can find the language locales in _data/locales/. The second reason is dynamic text generation from the includes - the target is to get language specific text out of the includes without code modifications.
Since we have now a localization we use it also on the delivered default pages - here as an example the complete index.md:
---
title: Home
---
{% include post-list-by-limit.html limit=5 %}

{% include translation text='more_in_the' %}
[{% include translation text='archive' %}]({{site.baseurl}}/archive),
{% include translation text='subscribe_via' %}
[RSS]({{site.baseurl}}/feed.xml)
For the start we support English (en) and German (de). We need help for more languages - so, if someone finished the translation for his language please create a pull request or provide the language file via a new issue.
Easy ToC creation
There are two ways to insert a table of contents. One is to do this with the documented way of the Markdown renderer kramdown:
## Table of Contents
{:.no_toc}

* Will be replaced with the ToC, excluding the "Table of Contents" header
{:toc}
The other way is to use the provided include:
{% include toc %}
With the include you can define your own header instead the localized default one:
{% include toc header="" %}
The header is omitted in the output if you provide a empty header variable - we use this here on the features page :-)
Figure captions with a CSS helper class
Real figure elements written in raw HTML
Markdown encourage you to use HTML when there is no easy Markdown syntax available - two examples:
<figure markdown="1">
```js
var example = "dummy string";
```
<figcaption>A real figure caption for a code snippet</figcaption>
</figure>
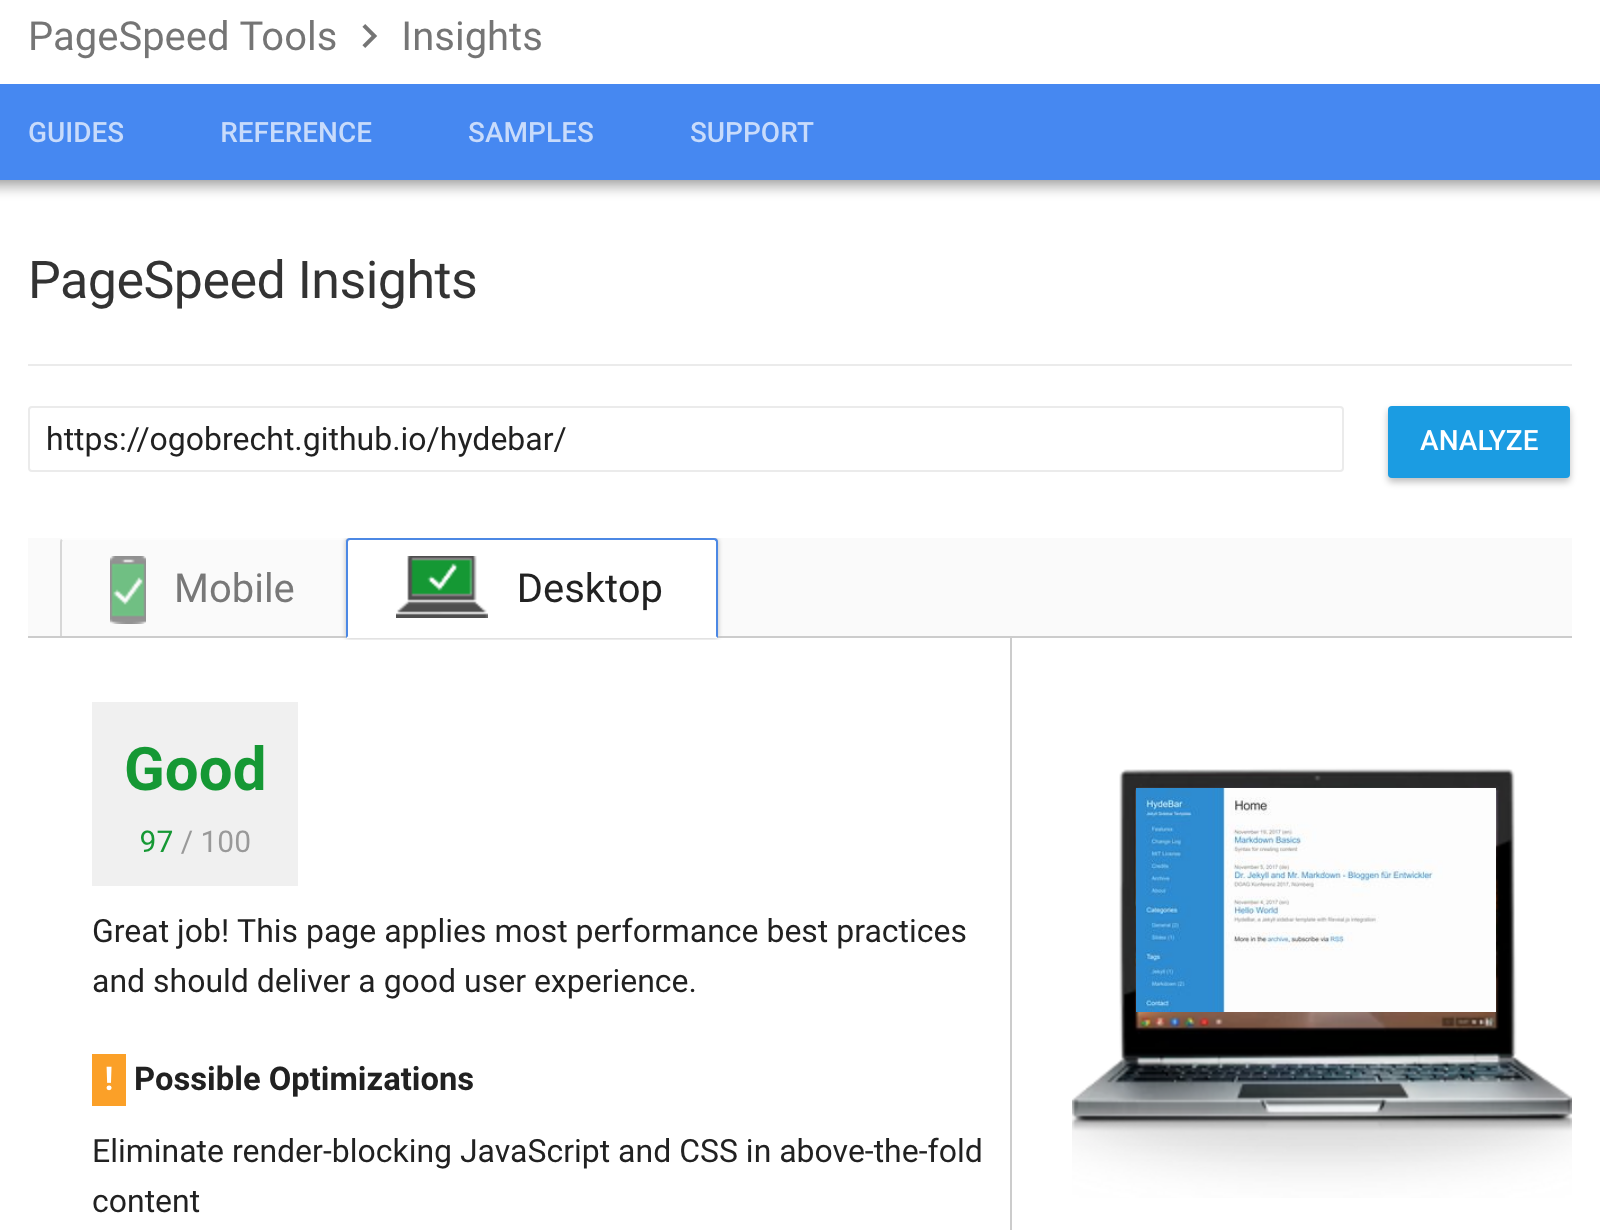
<figure markdown="0">
<img
src="{{site.baseurl}}/assets/images/page-speed-desktop.png"
alt="Page Speed" />
<figcaption>A real figure caption for an image</figcaption>
</figure>
Faked image and code captions
With the helper CSS class .figcaption or simply .caption. We use here the possibility to add attributes to elements - a functionality from the Markdown converter kramdown. The resulting paragraph with the class caption has a negative margin-top and is therefore more aligned to the previous element. Like the real figures it has also a different text color and decoration as the main text:
```js
var example = "dummy string";
```
Faked figure caption for a code snippet
{:.caption}

Faked figure caption for an image
{:.caption}
This is a faked figure caption for a code snippet
This is a faked figure caption for an image
Conclusion
If you want to be more semantic correct then use real figures and the possibility to place Markdown inside your figure elements. If you are lazy then use the possibility to add a class to your caption paragraph.
More CSS helper classes
There are some more CSS helper classes defined which can be useful - here are a text snippet from the about page which uses two of them:
![Avatar][1]{:.left.avatar} Hi, I am ...

[1]: https://avatars2.githubusercontent.com/u/10425445?s=400&v=4
here the corresponding CSS from the file _sass/sidebar/_3-helper-classes.scss:
.left {
    float: left;
    margin: 0.3em 1em 0.3em 0;
}

.avatar {
    border-radius: $base-border-radius * 2;
    width: 33%;
    min-width: 100px;
    max-width: 200px;
}
There are some more - the most interesting ones are probably these:
/* width from 5%, 10%, 15% up to 100% in 20 steps */
.width40 { width: 40%; }
.width75 { width: 75%; }

/* height from 20px, 40px, 60px up to 400px in 20 steps */
.height120 { width: 120px; }
.height360 { width: 360px; }

.shadow { box-shadow: $box-shadow; }
.noshadow { box-shadow: none; }
.nowrap { white-space: nowrap; }
You can use this to easily apply width and height styles to images, figures and other elements.
Disqus comments
The integration for Disqus comments is the original one from the base theme minima - it is documented here - you need only to provide your short name in _config.yml:
disqus:
    shortname: my_disqus_shortname
Google Analytics
Like for Disqus the integration of Google Analytics is the original one from the base theme minima - it is documented here - you need only to provide your key in _config.yml:
google_analytics: UA-NNNNNNNN-N
W3C valid output - fast and secure
The links below are not working in your local development environment:
- W3C’s Unified Validator: validate now
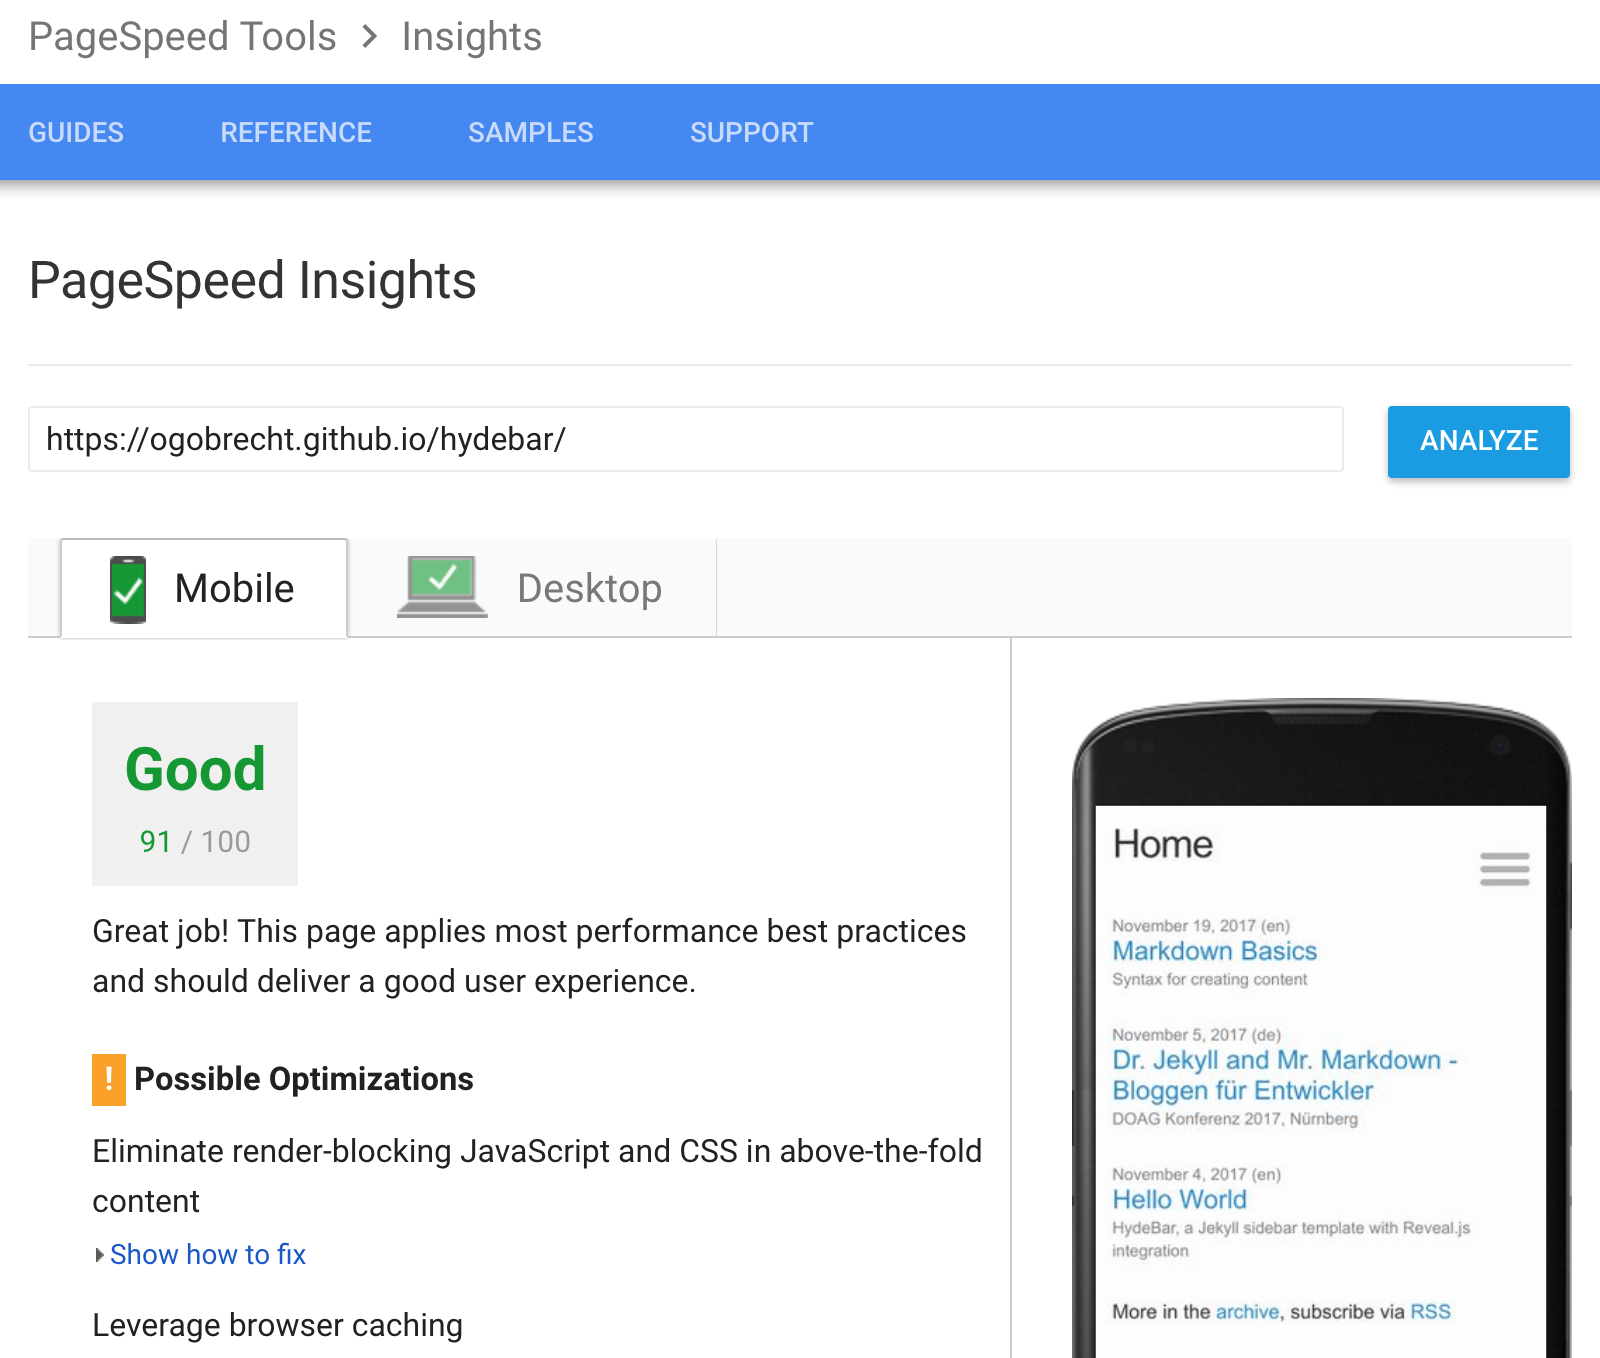
- Google PageSpeed Insights: check now
And your site is secure by default, it is a static site!